Showing posts with label Canning Recipe. Show all posts

Thursday, January 10, 2013

Homemade Vegetable Stock

It's Day 2 of my canning and sharing posts.  This time I wanted to make some vegetable stock.  
I came home with the tomatoes and peppers from Market on the Move.  
This recipe is amazing and I will definitely be making it more often.  
What's better than your own stock when you know exactly what is in it?  
And since I tried it in my favorite Artisan Bread, I'm definitely going to run out quick.  
More on that at the end of the post.

I have been pondering what the best approach would be to my food storage.  
Freeze dried and Dehydrated is sure the rage right now.  
And while I'm not discounting it at all, I live in Arizona. 
 What's the big deal with that you might ask?  

Well water is a precious comodity here.  
If you live in a place where that's not the case, this philosophy might not apply to you.  
But for us desert dwellers, water is all to precious.  
We are encouraged to store water, and I am doing that. 
But if water becomes scarce, 
I think I would rather use my precious water for 
drinking and washing, rather than reconstituting my food.  
This is why I bottle so much of what I store.  
The liquid is already there and I don't have to dip into my reserves to be able to eat what I've stored.  
Make sense?  Well maybe just to me.  But lets get to making some stock.

Vegetable Stock


Gather your vegetables.  You will need the following:

1 pound of carrots, washed and cut into 1 inch pieces
6 stalks celery, cut into 1 inch pieces
2-3 medium onions chopped
2 red sweet peppers, seeded and chopped
2-3 tomatoes, seeded and diced
3-4 cloves garlic, sliced
3 bay leaves
1 tsp dried basil
2-3 dried basil leaves
8 peppercorns

Place all veggies and herbs in a large stockpot and fill with water, about 6-7 quarts.
Bring to a boil.
Cover and reduce heat to a simmer for 2 hours.
Remove cover and continue simmering for 4-6 hours.

You could also do this in the crock pot.  
Cover for the first 2 hours on high, then lift the lid with knives laid across the top, 
and cook on low for 4-6 hours.


After the vegetables have cooked and the liquid reduced down, remove the bay and whole basil leaves,
then puree the mixture in your blender until smooth.
Strain through a wire mesh strainer.  Reserve the solids.  You can strain it again through cheese cloth if you want a thinner consistency.  I liked mine with a slight texture, so I only strained it once.

This is what I strained off.  I put it in the fridge in a sealed container to use when I make my garden breadsticks.


Ladle into prepared jars.  I know these are sweet potatoes, but I forgot to take a picture of the stock in the pressure canner.  Make sure the jars are covered with water and pressure at 10 lbs of pressure 30 minutes for pints, 35 minutes for quarts.  I'm using my Presto Pressure canner.  You can find them on my sidebar. 
 Let the pressure drop naturally.  Remove from canner and let sit for 24 hours on the counter.

Beautiful.

I scored with about 2 cups of stock left over that I didn't bottle.  I wanted to try it in my Artisan Bread.  I substituted 2 cups stock for water in the recipe and added 1 cup water to bring it to 3 cups liquid.  The bread was super moist and super yummy.  I like the slight orange-y tint to the bread, and the kids had no idea I snuck a whole bunch of veggies into their bread.  Love it!


 I just finished my piece of bread for lunch today.  I think it's almost better the second day.  Yummm...


Tomorrow it's sweet potatoes.  Be sure to come back!


Wednesday, January 9, 2013

Super-de-dooper Easy Jalapeno Jelly

It was another week at Market on the Move.  
This time I scored big time because there was no limit.  
I think I truly came home with 60 lbs of produce for only $10.  
One box was so heavy with sweet potatoes and honeydew that I had to have help carrying it, 
no thanks to my injured elbow.  
I really need to have that looked at.

Any-who, I got this recipe from Shar's.  It was at their Holiday Gifts class.  
I guess you could make this to give away, 
but once in a while it's nice to be selfish.  
I would be happy to share this jelly at a dinner party, but keep most of it for me!  
Well my husband too, if he asks nicely. ;)

I'm a baby when it comes to hot and spicy things.  
I've actually never bought a jalapeno before.  
Ever.  
But after trying this yummy jelly, I'm sold.  

Plus this recipe is super easy.  
No Steam or Boiling water canner.  No pressure canner.
All you need is a blender and a stock pot.  That's it.
And you can whip up a batch in about 20 minutes.  
Of course you'll have to wait 24 hours for it to set and seal, 
but for minimal work, 
you get something yummy and definitely a little different.

 Jalapeno Jelly


Gather your vegetables.  The color of the peppers doesn't matter.  
Since I only got Orange and Red, that's what I used, 
but green would be fabulous too and if you're allergic to the dyes in food coloring, use all green.

Wash, seed, and chop 3-4 bell peppers.

Next put gloves on.
I'm serious.
Put Gloves On!

To cut and seed the jalapenos, you need to wear gloves otherwise you'll have 1st degree burns on your hands.
My brain went out the window during clean up and I took them off.
Big mistake!  I only got a little bit on my right hand, 
but it burned and throbbed for the rest of the night.
SO... please please please - put gloves on when you are handling the Jalapenos.

You will need 6-10 jalapenos.
Remove the stems and use your thumb to push out the center seeds and veins.  
Immediately put in trash so no one accidentally touches them.


Now put the peppers and jalapenos in the blender and blend until well chopped.

Then add:
 1 cup cider vinegar
1/2 tsp butter
1 package of pectin

Blend well until desired consistency.  I left mine on high for 2-3 minutes.


Prepare jars.  This batch makes 3 1/2 pints of jelly.

Measure out 5 cups of sugar and set aside.

Pour the pepper/jalapeno mixture in a stock pot and bring to a full boil.
Boil for 1 minute.
Add sugar all at once and stir to mix.  Return to a full boil and  boil for 1 minute more.
Remove from heat.

Add green food coloring, one drop at a time until desired color.  I went a little heavy, about 10 drops.
If you're allergic to dyes, leave this step out.

Prepare lids in hot water in a sauce pan.


Ladle jelly into jars leaving 1/4 inch headspace.
Attach lids and rings and tighten.

Place jars upside down on a wire rack for about 1-2 hours.
Turn jars right side up and let sit for 24 hours.

Lable with date and DONE!

Easy peasy!


This jelly is scrumptious over cream cheese with crackers.

I'm canning a bunch more things this week.  Be sure to come back for the how-to's for sweet potatoes, grapefruit juice, vegetable stock, and tomato sauce.  
Let me just say... my house smells FABULOUS this week!


Thursday, November 8, 2012

Homemade Salsa - Canned

I'm still working on all the veggies I got from Market on the Move.  This time it's Tomatoes.  Since I'm the only one in my family that likes to eat them fresh, and there is no possible way I could eat all of them before they go bad, I decided to can some Salsa.  It's our favorite tomato thing in our house and we go through a ton of it.  Living in the Southwest and all that.    I've never made it with yellow grape tomatoes though and I thought it added a wonderful color combination.  Here's the quick recipe:


Homemade Salsa

Wash Tomatoes.
Cut and remove seeds from your tomatoes.  
I just ran my finger along the insides and the seeds kind of squish out. 
Not my favorite step, but it makes the salsa much nicer without all those seeds.


This batch will fill 1 1/2 quart jars with Salsa.  I made 2 batches.

Puree tomatoes in a blender to equal 4 cups of tomato puree.  Make it as smooth or as chunky as you want.
Put tomato puree in large bowl and add the following:

1-4oz can of diced green chiles.  I prefer Hatch's fire roasted.
1 medium onion chopped fine
1 bunch green onions, sliced thin
1 bunch cilantro cut in small pieces
1/8 tsp cumin
1 1/2 tsp kosher salt
1 1/2 tsp granulated garlic
1 tsp crushed red chili peppers
(I'm a baby when it comes to heated salsa.  1 tsp is my max.  If you want it hotter, by all means add more.)

Stir well and ladle in to prepared jars.
Attach lids and rings and process in boiling water or steam canner for 15 minutes.
Let rest 24 hours, then lable and add to your pantry.


Homemade Salsa.
The best thing you can do to a Tomato!

Tuesday, October 23, 2012

Pear Butter

I got a 40 lb box of Pears recently and it was fun to find some yummy ways to preserve summer's bounty.  Pear butter is another favorite, along with Pear Honey.  This recipe is super easy and oh so tasty.  Let me share how.

Pear Butter

Cut and core pears.  You don't have to peel them, just remove the stem and seeds.
I probably used 8-10 pears.  Enough to fill my crockpot.
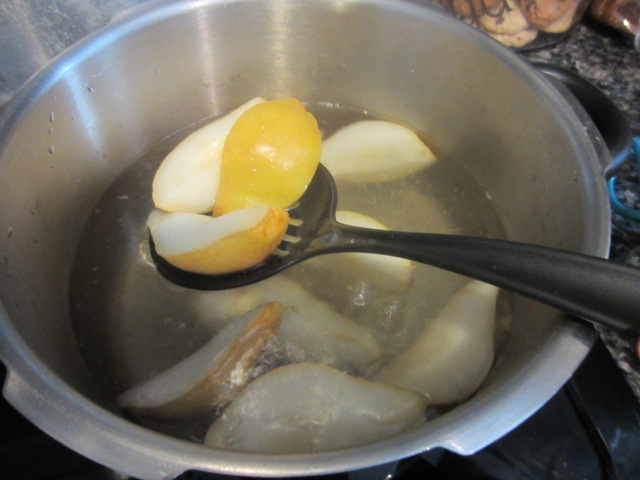
Put pears, a few at a time in boiling water to soften the pears.  About 1-2 minutes.
Remove using slotted spoon and put pears in blender.


Blend in blender until smooth.
You can still see the Pear Honey on my counter I still haven't put away yet.


 Fill your crockpot with pear-sauce.  Add the following:
1 1/2 tsp nutmeg
1/2 tsp cloves
1/4 tsp allspice
2 tsp orange zest
6 cups sugar


Lay some butter knives across the top as shown.  
You want the moisture to escape while the pear-sauce cooks down.


Lay the lid on top.
Let cook for at least 24 hours or until desired thickness.  I let mine cook down about 1 1/2 inches down from where I started.

When it's done, add 1 cup orange juice and stir well.

Process in prepared jars in a boiling water or steam canner for 20 minutes.

Remove and let rest overnight to ensure a good seal on your jar.  Lable and store in your pantry.


Pear Butter.

Summer's bounty turned Autumn Spice!

Love it!
Related Posts Plugin for WordPress, Blogger...